
Hardware discovery: ACPI & Device Tree
An overview of how a Unix-like BSD kernel performs hardware discovery on x86 and ARM to bind device drivers to hardware devices

If you grew up in the PC scene during the 1980s or early 1990s, you know how painful it was to get hardware to work. And if you did not witness that (lucky you) here is how it went: every piece of hardware in your PC—say a sound card or a network card—had physical switches or jumpers in it. These switches configured the card’s I/O address space, interrupts, and DMA ports, and you had to be careful to select values that did not overlap with other cards.
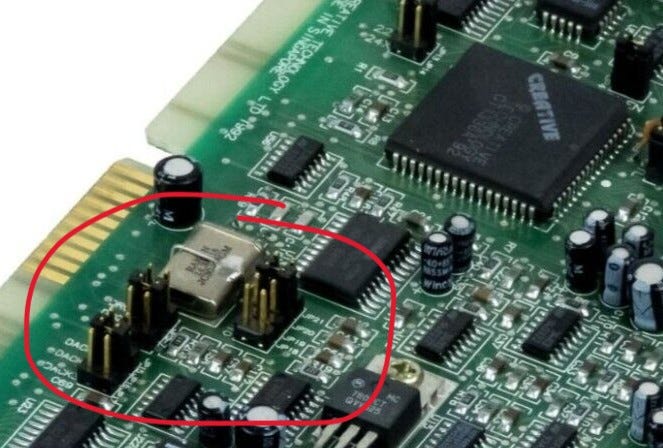
But that wasn’t all. Once you had configured the physical switches, you had to tell the operating system and/or software which specific cards you had and how you had configured them. Remember SET BLASTER=A220 I5 D1 H5? This DOS environment variable told programs which specific Sound Blaster you had installed and which I/O settings you had selected via its jumpers.
Not really fun. It was common to have hardware conflicts that yielded random lock-ups, and thus ISA “Plug and Play”, or PnP for short, was born in the early 1990s—a protocol for the legacy ISA bus to enumerate its devices and to configure their settings via software. Fast-forward to today’s scene where we just attach devices to external USB connectors and things “magically work”.
But how? How does the kernel know which physical devices exist and how does it know which of the many device drivers it contains can handle each device? Enter the world of hardware discovery.
Hardware topology
When you learn about the Von Neumann architecture in school, you are typically told that there is a CPU, a chunk of memory, and… “I/O devices”. The CPU and memory portions are where all the focus is put and the I/O devices portion is always “left to the reader”. However, there is a lot of stuff happening in that nebulous cloud.
The first question that arises is: what’s in that I/O cloud? Well, take a look:
Whoa, that’s a lot of stuff, but we can classify the items in the “nebulous cloud of I/O devices” into two categories:
The devices themselves, obviously.
The busses that connect those devices to the CPU.
Both are important: you might have a fancy keyboard with extra keys that requires a special driver, and this keyboard might come in PS/2 and USB versions. The driver for the keyboard may be the same for each version, but the “glue” that attaches this keyboard to either bus is different, and the way the kernel can tell whether the keyboard is attached to one port or another also differs.
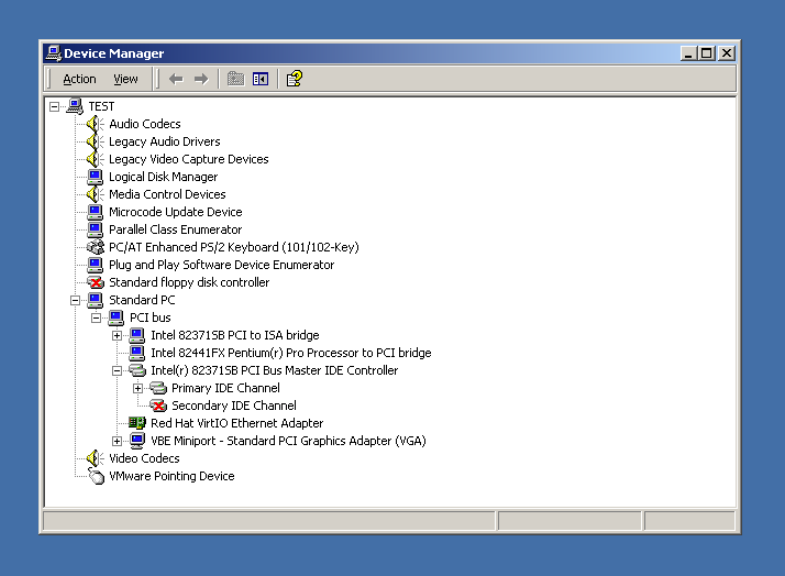
So how does the kernel know how to find hardware without tons of repeated code for every bus, you ask? It does so via its knowledge of the hardware topology. Just above, I showed you Windows’ view of this, but for the rest of this article, I’ll use the BSD internals (and NetBSD specifically) because that’s what I know best. Don’t let that put you off though: all kernels have to do something similar and the differences among them are likely not meaningful.
Here is a little snippet of the default NetBSD kernel configuration file for the amd64 platform. This snippet lays out the topology of serial ports in the PC and the busses in which they may appear:
pci*    at mainbus? bus ?
pcib*   at pci? dev ? function ?
puc*    at pci? dev ? function ?
com*    at puc? port ?

isa0    at mainbus?
isa0    at pcib?
com0    at isa? port 0x3f8 irq 4
com1    at isa? port 0x2f8 irq 3

acpi0   at mainbus0
com*    at acpi?
Daunting if you have never seen anything like this, I know, but let me translate this to a diagram:

Much clearer in picture form, right? What this chunk of configuration does is tell the kernel the places where the com driver can find serial ports. We have a chunk that says that com0 and com1 can appear on the ISA bus at specific I/O addresses and interrupts, and in turn that the ISA bus may be a directly-addressable physical bus (isa0 at mainbus?) and/or an ISA bus exposed via a PCI bridge (isa0 at pcib?). Then, we have additional entries telling us that the serial ports can also be configured via ACPI (com* at acpi?), and that the serial ports may exist on expansion cards (com* at puc?) providing communication ports via the PCI bus (puc* at pci?).
The problem is: the kernel configuration tells us what may exist, not what actually exists on a machine. In a sense, the configuration file “wires” the code of the device drivers like com so that they can find devices that appear under the isa, pci, or acpi busses. But the kernel must still, at runtime, check and see where the devices actually are. How does that happen?
Hardware auto-configuration
To answer the question of how the kernel discovers which hardware is present and where it is, let’s dissect NetBSD’s autoconf(9) manual page:
Autoconfiguration is the process of matching hardware devices with an appropriate device driver. In its most basic form, autoconfiguration consists of the recursive process of finding and attaching all devices on a bus, including other busses.
From this paragraph, we can extract the following: the kernel contains a collection of device drivers (like the com presented earlier). Device drivers are just code that knows how to interact with specific devices, but the “location” of these devices in the hardware topology may vary (the “bindings” to isa, puc, and acpi in the earlier example). Moving on:
The autoconfiguration framework supports direct configuration where the bus driver can determine the devices present. The autoconfiguration framework also supports indirect configuration where the drivers must probe the bus looking for the presence of a device. Direct configuration is preferred since it can find hardware regardless of the presence of proper drivers.
Direct and indirect configuration. Hmm. This sounds like the PnP story, and it kinda does. See, pay close attention to these two lines from the earlier snippet:
com0    at isa? port 0x3f8 irq 4
com1    at isa? port 0x2f8 irq 3
These are the BSD equivalent of the SET BLASTER=A220 I5 D1 H5 command for DOS I mentioned in the introduction: they tell the kernel which precise addresses and interrupts to use for the two standard PC serial ports if an ISA bus is present.
But what about com* at puc? and com* at acpi?? These lines are neat because they do not tell us, in advance, where to find the serial ports: we expect the kernel to discover those details at runtime so that we don’t have to recompile the kernel when the hardware changes. But even if these two look similar, they are quite different: the com* at puc? is an indirect configuration entry: the puc driver will have to probe the PCI bus for the presence of a communications card and, if one exists, tell the com driver that it can attach to it. On the other hand, the com* at acpi? entry is direct: the kernel will read the ACPI configuration (a static table) to know where the ports are and then use those details to configure the com driver.
Alright, so this raises another question. What is ACPI?
ACPI
ACPI, despite being declared with acpi0 at mainbus0 in a form similar to isa0 at mainbus?, is not a bus: ACPI does not physically connect devices to one another. To understand what ACPI does, we can start by realizing that it stands for Advanced Configuration and Power Interface and then, quoting the Wikipedia article:
Advanced Configuration and Power Interface (ACPI) is an open standard that operating systems can use to discover and configure computer hardware components, to perform power management (e.g. putting unused hardware components to sleep), auto configuration (e.g. Plug and Play and hot swapping), and status monitoring.
ACPI is about configuration, and the kernel uses the ACPI tables, present in any modern PC, to find where devices are. To illustrate how this works, let’s look at the com* at acpi? line. This line says that the serial port can be configured via ACPI if ACPI happens to have an entry for it. And you know, we can peek into the ACPI tables of a running machine to see what that might be:
# acpidump -dt | grep -A15 COM1
Device (COM1)
{
    Name (_HID, EisaId ("PNP0501") /* 16550A-compatible COM Serial Port */)  // _HID: Hardware ID
    Name (_UID, One)  // _UID: Unique ID
    Name (_CRS, ResourceTemplate ()  // _CRS: Current Resource Settings
    {
        IO (Decode16,
            0x03F8,             // Range Minimum
            0x03F8,             // Range Maximum
            0x01,               // Alignment
            0x08,               // Length
            )
        IRQNoFlags ()
            {4}
    })
}
# █
(Pro-tip: you can use acpidump to extract the Windows license key bound to your machine, if any. I’ve needed to do this in the past to install Windows in a VM after replacing the host OS with FreeBSD.)
Voila. The ACPI tables provided by the system tell us a similar story to what the explicit com0 at isa? entry did (and no surprise here because this is a legacy device): there is a serial port at base address 0x3f8 that uses interrupt 4. But also, this table tells us the hardware identifier for this entry: PNP0501. Grepping through the NetBSD kernel code base for this identifier, we land on the dev/acpi/com_acpi.c file:
static const struct device_compatible_entry compat_data[] = {
    // ...

    /* 16550A-compatible COM port */
    { .compat = "PNP0501", .value = COM_TYPE_NORMAL },

    // ...
};
(Another pro-tip: master ripgrep. Knowing how to find a needle in the haystack of a large code base will grant you super-powers among your coworkers. Being able to pinpoint where specifically to start an investigation based on a “random-looking” string is invaluable.)
Aha! This com_acpi.c file provides the necessary glue to direct the generic serial port com driver to the hardware via whatever the ACPI tables prescribe. From here, the kernel can proceed to attach the driver to the device and connect the dots between the user-space /dev/ttyS0 interface to the physical serial port.
Device Tree
In the world of embedded devices powered by SOCs—"System on a Chip", a term that describes single chips that provide all functions to build a computer, ranging from the CPU to sound and network cards—we don’t have ACPI tables. What we used to have instead was explicit code for every board/chip combination that knew how to address the hardware in each SOC. Linux used to be a mess of half-baked and abandoned forks, each supporting a different board without hopes of unification into mainline due to the lack of generic interfaces.
The Device Tree specification fixed this issue for the most part for architectures like aarch64. With Device Tree, each hardware or OS vendor provides a static table that describes the layout of a board’s hardware separately from the code of the kernel. Then, the kernel peeks into this table to know which devices exist and where they are in the machine layout, much like it does with ACPI.
A big difference with ACPI, however, is that the kernel cannot query the Device Tree from the hardware because… well, the Device Tree is external to the hardware. The kernel expects the Device Tree to “exist in memory” either because the kernel image embeds the Device Tree for the target board or because the boot loader loads the Device Tree from disk and passes it to the kernel.
Once the kernel has the Device Tree though, the hardware discovery process is similar to the one in ACPI: the kernel scans the Device Tree and looks for drivers that can attach to device nodes based on hardware identifiers. From the perspective of the kernel configuration, things look very similar between amd64 and aarch64. See this snippet from the generic kernel of the evbarm port:
armfdt0     at root
simplebus*  at fdt? pass 0
com*        at fdt? pass 4
This configuration snippet tells the aarch64 kernel that a com device may appear on fdt, which stands for “Flat Device Tree”. In turn, armfdt0 at root says that there is a specific driver named armfdt0 that provides access to the fdt loaded by the boot loader on an ARM machine.
We can inspect the Device Tree from the command line as the Device Tree is exposed via the same interface that OpenFirmware used due to its historical roots. For example, to fetch the portion of the Device Tree for the serial port on an aarch64 machine:
# ofctl serial1
[Caching 121 nodes and 781 properties]
clocks                  0000000e 00000000 ........ ........   ........
compatible              6272636d 2c62636d 32383335 2d617578   "brcm,bcm2835-aux
            0010:       2d756172 7400.... ........ ........   -uart"
interrupts              00000001 0000001d ........ ........   ........
name                    73657269 616c00.. ........ ........   "serial"
phandle                 0000004c ........ ........ ........   ...L
pinctrl-0               0000000f ........ ........ ........   ....
pinctrl-names           64656661 756c7400 ........ ........   default.
reg                     7e215040 00000040 ........ ........   ~!P@...@
status                  6f6b6179 00...... ........ ........   okay.
# █
A binary dump. OK, fine, we can intuit something out of this, but it isn’t particularly clear. The problem here is that we are looking at the binary encoding of the Device Tree (the DTB). But the DTB is built from a set of corresponding source files (one or more DTS files), and if we look at the common DTS for Broadcom 283x boards, we find the following more-readable content:
/ {
    aliases {
        /* ... */

        serial1 = "/soc/serial@7e215040";
    };

    soc {
        /* ... */

        serial@7e215040 {
            compatible = "brcm,bcm2835-aux-uart";
            reg = <0x7e215040 0x40>;
            interrupts = <0x01 0x1d>;
            clocks = <0x0e 0x00>;
            status = "okay";
            pinctrl-names = "default";
            pinctrl-0 = <0x0f>;
            phandle = <0x4c>;
        };
    };
};
The detail to highlight here is the brcm,bcm2835-aux-uart identifier. If we search for this in the code base with the ripgrep super-powers you gained earlier, we find the arch/arm/broadcom/bcm2835_com.c file, which contains:
static const struct device_compatible_entry compat_data[] = {
    { .compat = "brcm,bcm2835-aux-uart" },
    DEVICE_COMPAT_EOL
};
Once again: we found the glue that connects a generic com driver to a specific hardware device.
Loading DTBs at boot time
Let’s dig a bit further though. I mentioned earlier that the boot loader is responsible for loading the Device Tree into memory and passing it to the kernel. How is that done? Well, it really depends on the specific machine you are dealing with. In here, I’m just going to very briefly touch upon how the Raspberry Pi does it because that’s the specific non-PC hardware I have access to. And for this, I’ll take you through the investigative journey I took.
The specific problem I faced was that NetBSD was not able to discover the SPI bus even when I had enabled the right SPI driver in the kernel for my Raspberry Pi 3B. By that point, I was aware that DTBs existed and I suspected that something might be wrong with them, so my first instinct was to check and see what the DTB had to say about the SPI.
Digging through the FAT partition of the disk image I was using, I found the dtb/broadcom/bcm2837-rpi-3-b.dtb file—the DTB for my specific board. The way the Raspberry Pi boot loader finds this file is by looking for a file matching the board’s own name (bcm2837-rpi-3-b.dtb) in the location specified by the os_prefix configuration property in the config.txt placed at the root of the FAT partition.
Once I found that file and after learning about the dtc tool (the Device Tree Compiler) which transforms DTS files into DTBs and vice versa, I could decompile the DTS:
$ dtc -I dtb -O dts bcm2837-rpi-3-b.dtb -o bcm2837-rpi-3-b.dts
... various warnings ...
$ █
Then, peeking into the decompiled DTS file, I found:
spi@7e204000 {
    compatible = "brcm,bcm2835-spi";
    reg = <0x7e204000 0x200>;
    interrupts = <0x02 0x16>;
    clocks = <0x06 0x14>;
    #address-cells = <0x01>;
    #size-cells = <0x00>;
    status = "disabled";
    dmas = <0x0b 0x06 0x0b 0x07>;
    dma-names = "tx\0rx";
    phandle = <0x49>;
};
I verified that the SPI kernel driver recognized the brcm,bcm2835-spi identifier just as we did earlier on for the serial port. And it did match, so I was puzzled for a moment.
But then I noticed the innocuous status = "disabled" line. Aha! The SPI device was disabled by default. I modified that line with status = "okay" following what other entries in the DTS did, recompiled the DTS into the DTB:
$ dtc -I dts -O dtb bcm2837-rpi-3-b.dts -o bcm2837-rpi-3-b.dtb
... various warnings ...
$ █
… rebooted the board and… voila!
# dmesg | grep spi
[     1.000003] bcmspi0 at simplebus1: SPI
[     1.000003] bcmspi0: interrupting on icu irq 54
[     1.000003] spi0 at bcmspi0: SPI bus
# █
The kernel successfully attached the SPI driver and the SPI bus started working, which in turn led to a multi-hour debugging session to make the EndBASIC ST7735S driver work—but in the end it did.
Yes, there are nicer ways to do what I did here because the DTBs are provided by upstream and you should not be modifying them. What you should do instead is create a DTB overlay, which is a separate small DTB that “patches” the upstream DTB, and then tell the boot loader to process it via the dtoverlay stanza in the config.txt file. Details left to you, reader. Just beware that the Raspberry Pi boot loader is picky about file paths and the documentation is your friend here.
How do ACPI and Device Tree differ?
Based on everything I told you about here, ACPI and Device Tree look oddly similar—and that’s because they are! From the perspective of describing hardware to the kernel, the two technologies are equivalent, but they differ for historical reasons. ACPI has its roots in APM, a PC technology, whereas Device Tree is based on OpenFirmware, a technology that originated at Sun Microsystems for its SPARC machines and that was later used by Apple on their PowerPC-based Macs.
One difference between the two, though, is that ACPI does more than just describe hardware. ACPI provides a bunch of hardware-specific routines in a bytecode that the operating system can call into to manipulate the hardware. This is often maligned because ACPI introduces non-free and opaque blobs in the interaction between the operating system kernel and the hardware, but Matthew Garret has a great essay on why ACPI is necessary and why it is better than all other alternatives, possibly including Device Tree.
In any case, that’s all for today. I found this exercise of dealing with the Device Tree pretty fun and I thought I could share something interesting with you all. I intentionally omitted many details because the topic of hardware configuration is vast and tricky, but you can continue building your knowledge from the bits above and from the fabulous OSDev wiki.
Win 11 does have "Devices by connection" view in Device Manager. Although, admittedly, modern machines are too cluttered anyway to make a good device tree 101 example.